Laryngoscope blades and handles are reusable medical devices that require validated sterilization between patients. A lapse in sterilization protocol can transmit infections between patients — a serious safety incident. This guide provides the step-by-step protocol used in quality-managed hospital CSSDs (Central Sterile Services Departments) and small clinic settings alike.
Regulatory context
Laryngoscopes are classified as semi-critical medical devices — they contact mucous membranes but don’t penetrate sterile tissue. Regulatory guidance (CDC, WHO, and most national health authorities) requires high-level disinfection at minimum, with sterilization preferred where possible.
In practice, steam sterilization (autoclaving) is the accepted standard for reusable laryngoscope blades and handles in hospital settings, because autoclaving exceeds high-level disinfection in both efficacy and audit-ability.
The 7-step sterilization protocol
Step 1: Immediate pre-cleaning (point of use)
Immediately after use, wipe visible contamination from the blade with a disposable wipe. Submerge the blade and handle in an enzymatic transport container with lid — this prevents organic matter from drying and becoming hard to remove. Transport to the CSSD within 60 minutes.
Critical: Remove batteries from the handle before any liquid exposure. Some modern sealed handles are fully submersible, but most traditional handles will damage if immersed with batteries installed.
Step 2: Manual pre-rinse
At the CSSD, pre-rinse under running water to remove gross contamination. Use cool to lukewarm water only — hot water denatures blood proteins and makes them adhere to surfaces. No soap at this stage.
Step 3: Enzymatic soak
Immerse in enzymatic cleaning solution at manufacturer-recommended concentration and temperature for 5–15 minutes. Enzymatic solutions specifically break down proteins (blood, mucus, tissue debris) that simple detergents cannot remove. Use a fresh solution for each batch — diluted or contaminated enzymatic cleaner is less effective.
Step 4: Manual cleaning with soft brush
Under running water, scrub all surfaces with a soft instrument brush. Pay specific attention to:
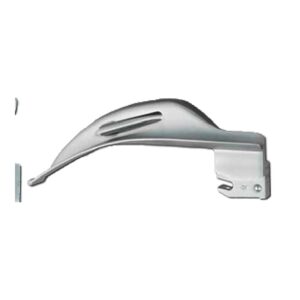
- The blade tip — where fiber bundle meets the metal
- The hook-on connection area — small crevices trap debris
- The articulation mechanism on McCoy blades — open and close during cleaning
- The handle battery compartment (with batteries removed)
- The light-coupling window on fiber optic blades
Do not use wire brushes — these scratch the stainless steel finish and create future corrosion sites.
Step 5: Rinse with deionized water
Rinse thoroughly with deionized (not tap) water. Tap water contains minerals that deposit on the instrument and cause water staining during autoclave cycles. DI water rinse is essential for long-term instrument appearance and performance.
Step 6: Inspection and testing
Before packaging for sterilization, inspect:
- Visual integrity — no scratches, dents, or visible damage
- Fiber bundle — connect to a test handle and verify light output at the tip
- Hook-on latch — confirm the spring-loaded mechanism operates smoothly
- Articulation mechanism (McCoy blades) — confirm smooth actuation and return
- Battery contacts (handles) — inspect for corrosion, clean with isopropyl alcohol if needed
Any instrument failing inspection is removed from service for repair or replacement.
Step 7: Autoclave sterilization
Package the cleaned instrument in standard autoclave pouches or wrapped trays. Sterilization parameters:
- Pre-vacuum autoclave: 134°C (273°F) for 4 minutes at 2.1 bar, with pre-vacuum and post-vacuum drying cycles
- Gravity displacement autoclave: 121°C (250°F) for 30 minutes at 1.1 bar
- Cycle documentation: record the cycle ID, temperature, pressure, time, and operator on the instrument tracking log
After autoclaving, allow the package to cool to room temperature before storage. Do not handle hot packages — rapid cooling creates condensation inside the pouch that compromises sterility.
What to avoid
Improper cleaning methods
- Ultrasonic cleaning over 30 minutes — can damage sealed fiber bundles over time through vibration stress
- Chemical sterilants not approved by the manufacturer — some chemistry degrades fiber optic seals
- Dry heat sterilization — temperatures required for dry heat degrade fiber bundle seals
- Gas (ethylene oxide) sterilization — unnecessary for autoclavable instruments and leaves residue
Physical damage
- Dropping blades onto hard surfaces — can fracture internal fiber bundles invisibly, resulting in reduced light output discovered only at next use
- Using wire brushes — scratch the mirror finish and create corrosion sites
- Forcing stuck articulation mechanisms — damages the internal linkage
Sterilization failures
- Loading the autoclave too densely — prevents steam penetration
- Using damaged or expired sterilization pouches — compromise the sterile barrier
- Inadequate drying — wet packages compromise sterility by wicking contamination
Instrument tracking
Quality CSSDs track each laryngoscope through its service life:
- Unique serial number engraved on each blade and handle
- Record of each sterilization cycle, linked to the autoclave cycle record
- Record of each clinical use, linked to the patient encounter
- Periodic inspection and functional testing (monthly or quarterly)
- Retirement record when the instrument reaches end-of-life
This tracking supports both infection prevention (if a post-procedure infection occurs, the instruments used can be identified and quarantined) and quality improvement (tracking instrument life trends informs replacement planning).
Instrument life expectancy
Quality reusable laryngoscope blades are designed for indefinite service life. Practical limiting factors:
- Fiber bundle light output — degrades slowly over thousands of cycles. Replace when output drops below 70% of initial.
- Mechanical wear on hook-on latch — can loosen after 5,000+ cycles
- Articulation mechanism wear (McCoy) — hinge pins can loosen after high-volume use
- Handle battery compartment corrosion — avoidable with proper battery maintenance
- Visible damage — scratches, dents, or deformation from dropping
A well-maintained Fizza Surgical blade should provide 3,000–5,000 autoclave cycles before any measurable performance degradation. Our lifetime warranty on the blade body covers manufacturing defects indefinitely.
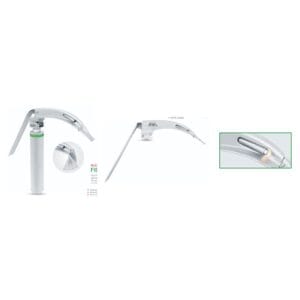
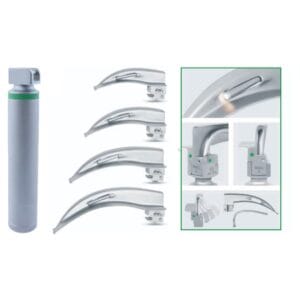
Sourcing autoclave-rated laryngoscopes
Fizza Surgical’s laryngoscope range is engineered for autoclave durability:
- AISI 304/420 stainless steel — corrosion resistant under repeated steam cycles
- Hermetically sealed fiber bundles — no fluid intrusion
- Laser-etched markings — survive thousands of autoclave cycles without fading
- 134°C autoclave rated — compatible with any standard hospital sterilization protocol
Browse our autoclavable laryngoscope range or request factory pricing. For hospital CSSDs standardizing laryngoscope protocols, we provide validation documentation including autoclave compatibility testing and material specifications.
Related reading
- Reusable vs Disposable Laryngoscopes: Cost Analysis
- Complete Guide to Fiber Optic Laryngoscope Blades
Where We Serve
Fizza Surgical exports to 50+ countries. Browse our country-specific pages with local regulatory guidance and pricing: